Saturday, March 3, 2012

Sea Scallop & Carmelized Onion Tart with Mango Sauce


Remember that high school band? The one that burst through my door as confetti fell from my ceiling when I posted my gazpacho recipe way back in August. Well, I don't think they'd be so proud of me now. I'll be lucky if they don't try to stuff me in their tuba.

The reason is this -- I have been sitting on this post for an inexcusable amount of time. Sometime back in July, I emailed my friend Philippe asking if he'd ever be interested in cooking something together. Philippe is this amazing French chef with a schedule about as crazy as mine, yet because he is such a wonderful friend, he wrote back and his response included the word, "YES" (I mean, in all caps, no less!).

I was beyond excited. We set ourselves to the task of deciding what to make. I made some vague, general (read: useless) suggestions, so Philippe decided he'd go straight to a trustworthy source for a recommendation. He emailed his mom in France and she suggested a tart she had just had a family celebration. He forwarded the recipe to me for approval. It was in french and I couldn't read it, but how could I not say yes?!


Philippe explained this is more "french-fusion" than anything (hello mango sauce), however the simplicity of recipe and the combination of flavors reminds me exactly of something that I could imagine myself ordering off the menu of some off-the-beaten-path french cafe. How can you go wrong with anything that conjures that kind of an image?


Do not fall prey to my old way of thinking, that anything containing sea scallops, or anything French for that matter, is too complicated to make. This could not be simpler. You prepare and bake a crust (or buy a pre-made one!). While the crust is baking, start carmelizing the onions. Make the mango sauce (or make it a day ahead!). Prepare the scallops any way you prefer, such as searing them in a skillet, or, as we chose, poaching them in butter. Then you layer the onions into the crust and top with the scallops. Drizzle with mango sauce before serving. Simple and delicious. Let's get into details* below.

*When I say "details", I mean I'll describe what I was able to write down during this whirlwind cooking adventure. Philippe, being the true chef, doesn't cook using recipes, and therefore, you'll see our basic ingredients and instructions below followed by disclaimers such as "adjust as necessary!", "to taste!", or "you might want to buy this in a store!".


The Mango Sauce:

3-4 large ripe mangos, peeled and cubed
1 cup of chicken stock
1 cup of heavy cream
salt & pepper to taste

Combine ingredients in a blender or food processor and blend to a smooth consistency. Be sure to taste as you go and make adjustments as necessary!


Carmelized Onions:

2-3 onions (we used red onions)
Olive oil
Butter (optional)
Sugar (optional)

The trick to carmelizing onions is to slowly cook them over moderate heat to break down and carmelize the onion's natural sugars.

Start by thinly slicing your onions. Then heat some olive oil (or a mix of butter and olive oil) over medium heat in a large skillet or saute pan. Throw in your onions and stir to coat with oil. Spread the onions out evenly and then simply let them cook, stirring occasionally. Adjust the temperature if it looks like it's too hot or is drying out the onions. After a while, sprinkle some salt and some sugar (if desired) over the onions and stir.

Let the onions cook for a while - about 30 to 60 minutes, until they are nice and soft and nicely browned.


The Scallops:

12 good quality sea scallops
salt & pepper
1-1/3 cups butter
a squeeze of lemon

I was watching a cooking show and the chef was explaining about different ways to prepare scallops. He then picked up a raw scallop and took a huge bite out of it! Apparently, scallops are safe to eat raw, as long as they're very fresh and you bought them from a trusted source. This helped me be a bit less afraid of undercooking them, and more afraid of overcooking them, which can make them rubbery.

First, pull off any adductor muscles still attached to the scallops and then salt and pepper to taste. Melt the butter in a saucepan over medium heat. When the butter is hot, add the scallops and cook, turning once, about 2 to 4 minutes, or until cooked through. Remove scallops from pan.


The Crust:

Here's where I let you down. I still do not have a really good homemade crust recipe that I love and trust, and so I can only advise you to use the recipe you love and trust (and maybe, you know, you could share your recipe with me...) OR, save some time and buy a store-bought crust. No one here will judge you, I promise.

If you do make your own crust, I saw Philippe throw some cheese into his to make it more savory. It was very worth it.


Assemble:

Layer the onions in the crust and top with the scallops. Drizzle the sauce over individual portions, or serve on the side. Easy and delicious!!

I can also see this served in a mini version - perhaps baking the crust in small tartlette pans, topping each portion with one to two scallops.


Saturday, August 13, 2011

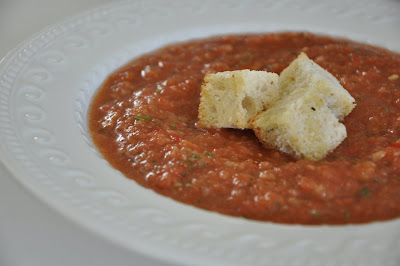
Gazpacho


I'm half expecting balloons and confetti to fall from the ceiling when I post this recipe. Maybe a high school band will burst through my front door playing something loud and festive. Then they'd applaud me. If this happens, I admit I'll be stunned, and maybe even a little upset at the band for interrupting Henry's nap. But I'll just be pretend-mad, because deep down I'll really be happy (who wouldn't be, right!?). Happy because I finally got my act together and posted something tomato related IN AUGUST. Woah. See, a celebration is indeed called for.

I made this gazpacho as a first course for a dinner I cooked with my friend Philippe, but I'm not going to tell you about that now, I'll tell you about that next. But what I will share now is that when I write that I cooked with my friend Philippe, that's code for "Philippe did all the cooking and I watched. And then ate". Keep that in mind when you read what I post after this recipe.

But back to the gazpacho. If there's ever a time to be making this, it's now. Tomatoes are at their peak and it's hot and summery outside. You can call this a soup, but it's really more like a liquid salad. A refreshingly delicious one at that.


Gazpacho

A word of advice: buy the best tomatoes you can. You want quality for this. 

Ingredients:

6 to 7 ripe tomatoes, peeled* and chopped
1 red onion, finely chopped
1 cucumber, peeled, seeded and chopped
1 red bell pepper, seeded and chopped
2 stalks celery, chopped
1 jalapeno, seeded and chopped
1-2 tablespoons chopped fresh parsley
2 tablespoons chopped fresh chives
1 teaspoon ground cumin
1 clove garlic, minced
1/4 cup red wine vinegar
2 tablespoons balsamic vinegar
1/4 cup olive oil
2 tablespoons freshly squeezed lemon juice
2 teaspoons sugar
Salt and freshly ground pepper to taste
6 or more drops of Tabasco sauce to taste
4 cups tomato juice

1) Combine all ingredients. Blend slightly in a food processor or with an immersion blender, to desired consistency. Place in a non-metal, non-reactive storage container. Cover tightly and refrigerate overnight, allowing flavors to blend.

*Easy peel those tomatoes! Score an "x" on the bottom of each tomato with a knife and immerse in boiling water for approximately one minute (until you see the skin start to come loose at the "x"). Remove tomatoes and place in ice water. The tomato skin will now easily peel off.


Thursday, July 28, 2011

Pizza with Red & Yellow Peppers


If you haven't already baked a thousand and one pizza pies and become an expert at throwing your basic pizza dough up into the air like a professional, then here is the perfect reason to break out your yeast and dust off your bag of flour.

When I wrote about the shaved asparagus pizza, I mentioned that I'd make it a goal to see what else I could shave and pile on top of pizza dough. And even though my follow-through on food related promises is very laughable (stop laughing), I was serious. Really! I was *this close* to picking up my vegetable peeler, kissing the family farewell, and setting off in search of the next great pizza topping.

Luckily, my friends Mike and Stacey saved the day by showing up for dinner and mentioning what has been their pizza obsession, and it goes something like this: thinly sliced bell peppers! Red onion! Fresh herbs! Cheese! 

If you don't have at least one dinner a week dedicated to pizza, as we do, you might want to try this out and see what transpires. Fridays, I've found, make great pizza nights.


Pizza with Red & Yellow Peppers
Adapted from Chez Panisse Vegetables, by Alice Waters


Ingredients:

2 bell peppers (any mix of red, orange or yellow)
1/2 of a small red onion
1/4 cup parsley
1/4 cup basil leaves
3 tablespoons olive oil
1 teaspoon red wine vinegar
salt and pepper to taste
2 ounces mozzarella cheese
1 clove garlic
basic pizza dough, or your preferred pizza dough for one 12-inch pizza

1) Preheat the oven to 500 degrees F.

2) Thinly slice the peppers and onion and roughly chop the herbs. Toss in a bowl with 2 tablespoons of the olive oil and the vinegar, and season to taste with salt and pepper. Mince the garlic and mix it with the remaining 1 tablespoon of olive oil.

3) Roll out your pizza dough and place it on a pizza pan sprinkled with cornmeal. Using a pastry brush or your fingers, brush on the garlic/oil mixture, leaving a 1/2-inch border.

4) Sprinkle on the grated cheese and spread the pepper mixture on top of that. Bake the pizza for 10 to 12 minutes or until the dough is crispy and thoroughly cooked.

Wednesday, July 20, 2011

Basic Pizza Dough


As I was about to post a second pizza recipe within a relatively short amount of time, I realized that you might appreciate a good recipe for quick, painless, delicious pizza dough first. Luckily, I have a recipe on hand that I have been using a lot lately and has become my standard go-to pizza dough.

Unless you live on the East Coast right now, where you can most likely cook a pizza on the sidewalk, I suggest you crank up your oven and try this out (perhaps with this!) knowing that a delicious pizza recipe is coming your way shortly!

Basic Pizza Dough


Makes enough for one 12 to 14-inch pizza.


1-3/4 cup unbleached all-purpose flour
1 teaspoon yeast*
1/2 cup lukewarm water
1 tablespoon milk
2 tablespoons olive oil
1/2 teaspoon salt

*I use instant yeast (Fleischmann's RapidRise yeast), but active dry yeast works as well.

Combine all of the ingredients, including the yeast, in a large bowl. When it begins to come together into a ball, dump everything out onto a lightly floured surface and knead until you've worked out your day's frustrations, or until you've got a nice ball of dough, whichever comes first.

Lightly oil a bowl and place the dough inside, turning to coat all sides. Cover with a towel or plastic wrap and set aside for an hour or two to let the dough double in size.

After the dough has risen, punch it down and roll it out. Top with your favorite pizza toppings and bake on a baking sheet or pizza stone sprinkled with cornmeal in an oven preheated to at least 500 degrees F. The pizza should be done in about 10 to 12 minutes.

Monday, June 27, 2011

Devil's Food Cake with Chocolate Ganache Frosting


It should come to be expected that every June you will see a cake recipe posted here. It's obligatory, really, the June birthday cake.

I and several of my friends celebrate birthdays in June or around this time, so we use this as an excuse to get together to eat and chat, catch up, and, undoubtedly, laugh. And so we do, until, of course, someone finally, and usually impatiently, asks, "so when are going to cut the cake?".

No birthday is complete without a surprise, right? There aren't any trick candles here (aren't those things annoying?) the surprise is that this cake is baked with pureed beets, which is a traditional way of making devil's food that dates back to wartime rationing.

Beets in cake?

Dessert justified?

Happy birthday to me!


Devil's Food Cake
from Mother's Best: Comfort Food That Takes You Home Again, by Lisa Schroeder

I can't stress enough that you should freeze the cake layers after you've baked and cooled them, and the reason is two-fold. One, it breaks up the baking and assembling process, which, done all at once, can be quite daunting and Two, it's so much easier to assemble and frost frozen layers. 

To freeze your cake layers, let them cool completely after baking. Then wrap each layer thoroughly in plastic wrap and place on a flat surface in the freezer. I stack mine on small cookie sheets placed on top of my stackable cooling racks.

For the cake:
2 cups all-purpose flour
2 teaspoons baking soda
1/4 teaspoon salt
3 ounces chopped semisweet chocolate
8 tablespoons unsalted butter, at room temperature
2-1/4 cups packed light brown sugar
3 large eggs, at room temperature
1/2 cup buttermilk, at room temperature, divided
1 (15 ounce) can beets (not pickled!) with the juice, pureed until very smooth

1) Preheat the oven to 350 degrees F. Using butter, oil, or nonstick cooking spray, thoroughly grease the bottom and sides of two 9-inch cake pans and line their bottoms with parchment paper circles.

2) Sift together flour, baking soda, and salt. Set aside.

3) Place a medium saucepan about one third full of water over medium-high heat and bring to a simmer. Reduce the heat to low to keep the water warm but barely simmering. Place the chopped chocolate in a double boiler or bowl that fits over the saucepan. Set the bowl over the barely simmering water and heat, stirring now and then, until the chocolate is melted. Set aside to cool to lukewarm.

4) Place the butter and sugar in a large bowl and beat on high speed, stopping to scrape down the sides now and then. Beat until light and fluffy and pale in color, about 5 minutes.

5) Reduce the speed to medium-high and add the eggs, one at a time, beating until fully incorporated after each addition. Reduce the speed to low and pour in the melted and cooled chocolate. Increase the speed to medium and beat for another minute, until incorporated. Scrape down the sides of the bowl.

6) With the mixer on low speed, add one-third of the dry ingredients. When incorporated, add 1/4 cup buttermilk. Repeat the process, ending with the last third of dry ingredients. When incorporated, add the pureed beets with their juice and mix on low speed until incorporated. Scrape down the sides of the bowl as needed.

7) Evenly divide the batter between the prepared pans and bake for 35 to 40 minutes or until a toothpick inserted into the center comes out clean. Cool cakes on a wire rack to cool for 20 minutes, then remove cakes from pans and cool completely on wire rack before frosting or freezing (see note above).

For the frosting:
1 cup heavy cream
16 ounces semisweet chocolate, finely chopped

1) Place the cream in a medium saucepan and bring to a simmer over medium-high heat.

2) Remove the cream from the heat and whisk in the chocolate. Keep whisking until the chocolate is melted.

3) Let the mixture cool on the counter, stirring occasionally, until spreadable, about 2 hours (the time it should take to make, bake, and cool the cake layers, if you choose not to freeze the layers).

Assemble the cake:
1) Place one cake (bottom side up) in the center of a serving plate. Tuck a few strips of parchment or wax paper under the edges of the cake to keep the plate clean. Place one-quarter of the frosting in the center of the cake and spread to cover the surface. Place the second layer on top of the first and frost the top and sides of the cake. Remove the strips of parchment paper when finished.

Monday, June 13, 2011

Potato Salad with Whole-Lemon Vinaigrette


When I read blog posts bashing traditional mayonnaise-based potato salad, it makes me sad, because when I summon my happy potato salad memories (we all have these, right?), the first to come to mind are those involving my grandma's salad, dressed in all its creamy goodness. In fact, maybe if you asked, perhaps you'd find out that sometimes I even thought the salad could've used more mayo, but no, I would never openly admit to that, at least not here, because it might leak back to my grandma and then I'd have some serious explaining to do.

So why then, after saying all that, am I posting a non-mayo recipe? Because when I read in the recipe that you throw a whole lemon into the food processor, I thought, "awesome", and kind of stared off into space thinking about it. I know it's just a lemon, but it sounded like a misprint to me, as if the recipe were asking me to throw in an entire watermelon, or something equally absurd. Surely, I thought, the recipe means I have to zest then juice the lemon. But no, I could find no small print or footnotes or hidden messages to be decoded with my decoder ring saying the contrary.

So it is because I became obsessed with food processing that lemon that you are now reading this post. And this is a good thing for a few reasons. The most important being that I really enjoyed this salad, but also, because a holiday that screams for backyard parties which themselves scream for potato salad is coming upon us, and while I'm not trying to tell you what to do, I'll just mention that this salad actually tastes best at room temperature and won't need to be thrown out after you forget to refresh the ice it's been sitting in out on the backyard picnic table.

Potato Salad with Whole-Lemon Vinaigrette

So, after luring you here with talk of throwing a whole lemon into the food processor, I'll admit that you do first have to cut it into quarters, or whatever size is necessary, so that the seeds can be removed. It does take some of the fun away, but it's a step I wouldn't recommend skipping. Sorry.

Ingredients:
3 pounds large Yukon gold potatoes, unpeeled
1 whole lemon
2/3 cup olive oil
2 large cloves garlic
salt
pepper
1/4 fresh mint
sliced scallions (optional)

1) Scrub potatoes and place in a large pot of salted water. Bring to a rapid boil, then lower heat and cook until tender, about 30 to 40 minutes. Drain well under cold water and refrigerate overnight, or until very cold.

2) Peel potatoes and cut into 1/2-inch cubes. Place in large bowl.

3) Cut off ends of lemon and cut into quarters to remove seeds. Place lemon wedges (rind and all) in a food processor with olive oil and garlic. Process several minutes until smooth. Add salt to taste.

4) Pour dressing over potatoes and toss gently. Salt and pepper to taste.

5) Thinly slice the mint, or pulse a few times in the food processor and toss with the potatoes. Toss in some scallions if desired.

Monday, June 6, 2011

Chipotle Hummus


I believe one of the cruelest tricks the Universe can play on someone is to make that person sick, then make that person's husband sick, and then to stick those two people in an apartment with a teething 9 month old baby boy who just learned how to crawl. I'm not complaining, but these last few days have been a bit challenging.

It all started innocently enough - we just wanted a vacation. So we packed up the wee one and his three truckloads-worth of essentials and whisked ourselves away to a rented cottage at our favorite bed & breakfast in Joshua Tree. And it was great. We lounged. We snoozed. We put on mini swim trunks and amazed ourselves with splashing (some of us did, anyway). Then all of that relaxation was forgotten as we sat in traffic on our way back to reality and wallowed in our newly acquired colds. Sigh.

Needless to say, most of the "cooking" that's been done lately has involved a can opener and some hastily purchased cans of chicken soup. However, before leaving on our trip, I made sure to stock up on the ingredients for my friend Jennica's chipotle hummus, so, in between napping and chasing after the baby, I was able to make up a batch, which made me happy, because this stuff is delicious and because, in my opinion, you can never have enough hummus around - especially when you eat it by the spoonful.

Chipotle Hummus
from Paulo Avery Wellman


This recipe can yield a pretty spicy hummus, but if you don't do spicy it's possible to dial down the kick by adding some water and lemon juice, which is what I did merely because I couldn't fathom adding as much olive oil to the recipe as it would take to reach the consistency I was going for.

Ingredients:
2 cans garbanzo beans, rinsed and drained
4 cloves garlic
2 chipotle peppers from a can of peppers in adobo sauce
1 tablespoon of tahini paste
1-1/2 tablespoons of ground cumin
1 tablespoon of paprika
1 tablespoon of fresh parsley
salt to taste
extra virgin olive oil (approximately 1/2 cup)*

In a food processor or blender add garlic and pulse until finely chopped. Add remaining ingredients through parsley and blend. While blending, slowly pour in olive oil stopping periodically to scrape down the sides and check the hummus consistency. Continue adding oil until hummus reaches a consistency of your liking. Add salt as needed. Garnish with chopped parsley and paprika.

*In addition to the oil, I added 1/2 cup of water and the juice from half a lemon.